Reveal
The idea of this type of animation is for information to be revealed as the user passes the mouse or clicks on an image. It might suit a teaching sequence or a quick quiz plenary. The example below is the example given in the Flash template files.
The example shown displays a prompt when the user rolls the mouse over a part of the diagram and then shows the answer label when that part is clicked.
This alternative example does not have any prompts and the user can hide a label by clicking on it.
The trouble with this sort of animation is that the position of the labels and of course their content depend on the diagram and so only so much can be automated. The instructions below describe how to produce the activity more or less from scratch but saving you the trouble of writing most of the code. There are three sections and you can use these links to jump straight to a particular one.
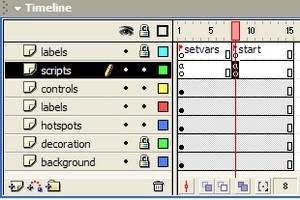
First of all, a quick look at what is on the timeline.
- The labels layer provides pointers to two keyframes in the movie; setvars is when variables are set and also where the main code can be found in the scripts layer, start points to the frame where the movie waits for the user to do something interesting with the mouse.
- The scripts layer is where most of the code is.
- The controls layer holds the buttons and a text box to display prompts for each label.
- The labels layer is used to hold the label movie clips.
- The hotspots layer contains the movie clips that respond to the user's mouse actions.
- The decoration layer has the image and any instructions you might want to add. The background layer is used for the background colour and border.
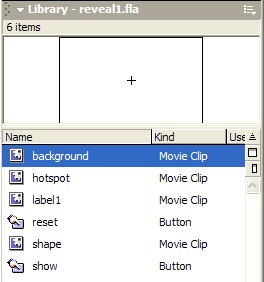
Now, the library. Remember that it contains the movie clips that are used in the movie either individually (e.g. label1) or by being copied onto the stage (e.g. hotspot).
- Edit background if you want to alter the background of each label.
- hotspot is a general shape (in this case an oval) that detects mouse movements on specific parts of the image. You can edit it to be any shape you want.
- label1 is a specific movie clip with an appropriate label for a specific part of the diagram. This will be duplicated and edited for all the labels.
- reset and show are the two buttons that can be used to hide everything or show everything.
- shape is a movie clip used to colour the labels background (in the background movie clip). The idea is that editing shape will alter the background of all the labels at once.
Okay, using the first label as an example, here is how you create the activity, adding as many additional labels as you need by editing what is already there.
I am assuming that you will be starting with reveal1.fla as a template and then adding labels to get the hang of how it works.
However, you might want to create your own activity (since this is likely to be more useful to you). In that case, load up the template, unlock the decoration layer and import your own image onto the layer. Here is a link to the instructions on producing a drag and drop activity if you are not sure about how to do this.
Once you have imported the image, make sure that there is plenty of room around it to place its labels and then lock the background layer to stop accidents as you place other objects on the other layers later on.